Fine-Tune Llama 3.1 on Multiple GPUs with Axolotl and DeepSpeed
A hands-on walkthrough for running distributed Llama 3.1 fine-tuning jobs using Axolotl's YAML-driven config system and DeepSpeed ZeRO-3. Here we target 2–8 GPU setups on cloud or local hardware.

This article is part of the Fine-Tuning Llama 3: The Complete 2026 Guide. This is Chapter 2 in the series.
In our previous tutorial, we explored the steps for configuring Unsloth on a single GPU. But once your dataset grows, a single GPU is not the right tool.
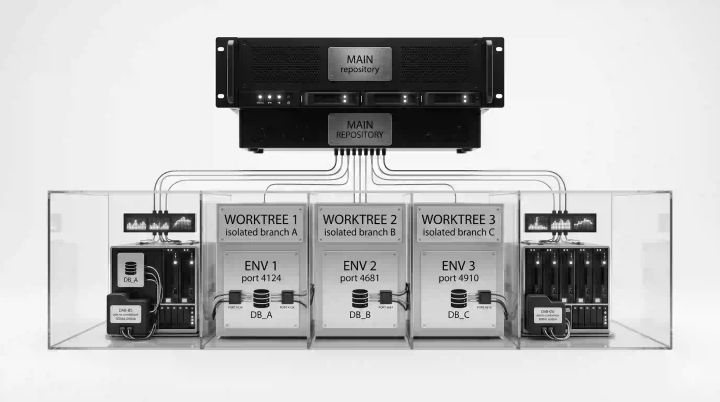
Scaling out requires a distributed topology, which is why production LLM fine-tuning pipelines rely on Axolotl multi-GPU orchestration. The Axolotl framework eliminates Python boilerplate entirely; you write a single YAML configuration recipe, point it at your Llama 3.1 model and dataset, and accelerate launch handles the workload distribution across your cluster.
In this guide, we will walk through this entire multi-GPU process end-to-end.
By the end of this guide, you will have:
- Installed Axolotl with DeepSpeed and Flash Attention on a multi-GPU machine
- Written a production Axolotl YAML config for QLoRA fine-tuning on Llama-3.1-8B across 4 GPUs
- Launched a distributed training job with DeepSpeed ZeRO-3 optimizer sharding
- Verified VRAM distribution, monitored loss, and caught failure modes early
- Merged your LoRA adapter weights into the Meta Llama 3 base model layers and run a validation inference test
Time required: ~2 hours total (mostly waiting for training — setup is under 20 minutes)
Cost: ~$3–6 on RunPod with 4x A100-40G at $1.50/hr, or free if you have on-prem hardware
📚 Fine-Tuning Llama 3 Series
- Chapter 1: Unsloth QLoRA on Llama-3.1-8B (Single GPU)
- Chapter 2: Axolotl Multi-GPU Fine-Tuning Walkthrough
[← you are here]- Chapter 3: Unsloth vs. Axolotl: Benchmarks and Working Configs
- Chapter 4: Preparing Instruction Datasets for Llama 3
- Chapter 5: LoRA vs. QLoRA vs. Full Fine-Tuning
- Chapter 6: RoPE Scaling and Context Length Extension
- Chapter 7: Evaluating Your Fine-Tuned Model
- Chapter 8: Exporting to GGUF and Serving with Ollama
- Chapter 9: Common Llama 3 Fine-Tuning Errors and Fixes
When to Use Axolotl Instead of Unsloth
Both Axolotl and Unsloth fine-tune Llama 3.1. The difference is what they optimize for.
Unsloth patches PyTorch kernels at runtime to squeeze maximum speed out of a single GPU. It is the fastest option on one GPU, has great Colab support, and the Python API keeps things transparent. The tradeoff is that multi-GPU support is limited and the config lives only in code.
Axolotl is the opposite. It is entirely YAML-driven, has first-class multi-GPU and DeepSpeed support, and is designed for teams running repeatable experiments with config diffs tracked in Git. It does not have Unsloth's custom CUDA kernels, so single-GPU throughput is lower. But that stops mattering once you are distributing work across four or eight GPUs.
If you ran the single-GPU Unsloth tutorial and hit any of the following walls, then choose Axolotl over Unsloth:
- You need to train on a dataset larger than ~50K samples and a single GPU bottlenecks throughput
- You want to run full fine-tuning or full LoRA (not QLoRA) on Llama-3.1-70B
- You want training configs stored as files and tracked in version control
- You need DeepSpeed ZeRO-3 to shard optimizer states and model weights across multiple GPUs
- You are building a repeatable pipeline that other engineers need to run
If none of the above applies, stay with the Unsloth tutorial — it is faster and simpler for single-GPU work.
Prerequisites
The minimum useful setup for this tutorial is 2 GPUs. More is better, but not required to follow along.
Hardware
| Multi-GPU Compute & Workload Capacity Matrix | |||
|---|---|---|---|
| Setup | GPUs | VRAM per GPU | What Fits |
| Minimum | 2x A10G | 24 GB | Llama-3.1-8B full LoRA |
| Recommended | 4x A100-40G | 40 GB | Llama-3.1-70B QLoRA |
| Large-scale | 8x A100-80G | 80 GB | Llama-3.1-70B full FT |
For cloud rentals, Lambda Labs and RunPod both offer multi-GPU instances. When choosing between instance types, it is recommended to use NVLink over PCIe interconnect. ZeRO-3 moves parameter shards across GPUs on every forward and backward pass. NVLink bandwidth (600 GB/s) vs PCIe bandwidth (64 GB/s) is a ~4x difference in inter-GPU communication speed.
Software
- Python 3.10 or 3.11 (not 3.12 — DeepSpeed has unresolved issues on 3.12)
- CUDA 12.1+
- PyTorch 2.3+
- A Hugging Face account with a read token and Meta Llama 3.1 license accepted
Check GPU visibility before anything else:
nvidia-smiExpected output (4x A100 example):
# nvidia-smi
+-----------------------------------------------------------------------------+
| NVIDIA-SMI 535.129.03 Driver Version: 535.129.03 CUDA Version: 12.2 |
+-------------------------------+----------------------+----------------------+
| GPU Name Persistence-M| Bus-Id Disp.A | Volatile Uncorr. ECC |
| Fan Temp Perf Pwr:Usage/Cap| Memory-Usage | GPU-Util Compute M. |
| | | MIG M. |
|===============================+======================+======================|
| 0 A100-SXM4-40GB On | 00000000:00:04.0 Off | 0 |
| N/A 42C P0 64W / 400W | 4MiB / 40960MiB | 0% Default |
| | | N/A |
+-------------------------------+----------------------+----------------------+
| 1 A100-SXM4-40GB On | 00000000:00:05.0 Off | 0 |
| N/A 41C P0 61W / 400W | 4MiB / 40960MiB | 0% Default |
| | | N/A |
+-------------------------------+----------------------+----------------------+
| 2 A100-SXM4-40GB On | 00000000:00:06.0 Off | 0 |
| N/A 43C P0 65W / 400W | 4MiB / 40960MiB | 0% Default |
| | | N/A |
+-------------------------------+----------------------+----------------------+
| 3 A100-SXM4-40GB On | 00000000:00:07.0 Off | 0 |
| N/A 40C P0 60W / 400W | 4MiB / 40960MiB | 0% Default |
| | | N/A |
+-----------------------------------------------------------------------------+
If any GPU is missing here, stop. Fix the driver/CUDA setup before touching Axolotl. A missing GPU that shows up mid-training causes NCCL to hang with no clear error message.
Step 1: Install Axolotl, DeepSpeed, and Flash Attention
- Axolotl version: latest from PyPI (
axolotl[deepspeed]) - Flash Attention: required for A100/H100; skip on older V100 or T4
- DeepSpeed: bundled with the
[deepspeed]extra, but verify separately
Create a fresh virtual environment. Training jobs that last hours should not share dependencies with other projects:
python -m venv axolotl-env
source axolotl-env/bin/activate
Install PyTorch with the correct CUDA index before installing Axolotl. If you install Axolotl first and let it pull PyTorch automatically, you risk getting a CPU-only build:
pip install torch==2.3.0 torchvision torchaudio --index-url https://download.pytorch.org/whl/cu121Now install Axolotl with DeepSpeed:
pip install axolotl[deepspeed]Install Flash Attention. This compiles from source and takes approx 5–10 minutes:
pip install flash-attn --no-build-isolation💡 Tip: Ifflash-attnfails with a CUDA version mismatch, pin to a pre-built wheel:
The mismatch usually means your system CUDA and the PyTorch CUDA version disagree. Runpython -c "import torch; print(torch.version.cuda)"andnvcc --versionto compare them. They must match.
Verify all three libraries are loaded:
python -c "import axolotl; import deepspeed; import flash_attn; print('All imports OK')"Run ds_report to verify DeepSpeed compiled its ops correctly:
ds_reportYou should see a table of ops. The ones that matter for this tutorial are cpu_adam and async_io — both should show [YES]. If cpu_adam shows [NO], optimizer offload to CPU will not work (relevant in Step 4).
Expected output (abbreviated):
# ds_report
DeepSpeed C++/CUDA extension op report
=====================================
[WARNING] async_io requires the libaio.so object but it was not found; ...
[OK] fused_adam .................. [YES] compiled
[OK] cpu_adam .................... [YES] compiled
[OK] async_io .................... [YES] compiled
[OK] utils ....................... [YES] compiled
Step 2: Authenticate with Hugging Face
Llama 3.1 is a gated model. Meta requires you to accept their license on the model card before the weights can be downloaded. If you have not done this yet, go to huggingface.co/meta-llama/Meta-Llama-3.1-8B-Instruct and click the license acceptance form.
Then authenticate your CLI:
huggingface-cli loginPaste your token when prompted. To confirm access works before spending time on config files, do a quick download test:
huggingface-cli download meta-llama/Meta-Llama-3.1-8B-Instruct --include "config.json"If you get a 401, it means your token is wrong or expired. 403 is a more common error, and means you have not accepted the license.
Step 3: Write the Axolotl YAML Config
Axolotl is entirely config-driven. No Python boilerplate, no notebooks. One YAML file controls everything: the model, dataset, LoRA settings, training hyperparameters, and DeepSpeed integration. This file also replaces the Python boilerplate you would otherwise write with Hugging Face Transformers + PEFT + TRL directly.
Create a working directory and the config file:
mkdir axolotl-llama3 && cd axolotl-llama3
touch llama3_qlora_multi_gpu.yml
Here is a production-ready config for QLoRA on Llama-3.1-8B across 4 GPUs. Each block is annotated:
# llama3_qlora_multi_gpu.yml

# ─── Model ────────────────────────────────────────────────────────────────────
base_model: meta-llama/Meta-Llama-3.1-8B-Instruct
model_type: LlamaForCausalLM
tokenizer_type: PreTrainedTokenizerFast

# Load in 4-bit for QLoRA. Set to false for full LoRA or full FT.
load_in_4bit: true
load_in_8bit: false

# Flash Attention 2 cuts memory and speeds up attention on A100/H100.
flash_attention: true

# ─── Dataset ──────────────────────────────────────────────────────────────────
datasets:
  - path: mhenrichsen/alpaca_data_cleaned
    type: alpaca

# Llama 3.1 Instruct uses the <|begin_of_text|> / <|eot_id|> chat template.
# Setting this to llama3 makes Axolotl apply it automatically.
chat_template: llama3
dataset_prepared_path: ./prepared_data
val_set_size: 0.02

# ─── Sequence Length ──────────────────────────────────────────────────────────
sequence_len: 4096
sample_packing: true       # Packs multiple short samples into one sequence → better GPU utilization
pad_to_sequence_len: true

# ─── LoRA / QLoRA ─────────────────────────────────────────────────────────────
adapter: qlora
lora_r: 32
lora_alpha: 64             # Convention: alpha = 2 × r
lora_dropout: 0.05
lora_target_linear: true   # Targets all linear layers. More conservative: set lora_target_modules explicitly.

# ─── Output ───────────────────────────────────────────────────────────────────
output_dir: ./outputs/llama3-qlora-run1

# ─── Training ─────────────────────────────────────────────────────────────────
num_epochs: 3
micro_batch_size: 2        # Per GPU. Total effective batch = micro_batch_size × gradient_accumulation × num_gpus
gradient_accumulation_steps: 4
# Effective batch size here = 2 × 4 × 4 GPUs = 32

optimizer: adamw_bnb_8bit  # paged_adamw_32bit is an alternative for full FT
lr_scheduler: cosine
learning_rate: 0.0002

warmup_steps: 50
logging_steps: 10
eval_steps: 200
save_steps: 200
save_total_limit: 3

# Mixed precision. Use bf16 on A100/H100. Use fp16 on older V100/T4.
bf16: true
fp16: false
tf32: true

# Gradient checkpointing trades compute for memory. Essential for multi-GPU QLoRA.
gradient_checkpointing: true

# ─── DeepSpeed ────────────────────────────────────────────────────────────────
# Point to a DeepSpeed config file (created in Step 4).
deepspeed: ./deepspeed_z3.json
What are we doing here?
- Using
lora_r: 32vslora_r: 16(used in the Unsloth tutorial). With multiple GPUs and larger effective batch sizes, higher rank adapters train more stably without overfitting. sample_packing: trueis critical for multi-GPU efficiency. Without it, short samples waste GPU cycles on padding. With 4 GPUs and a 4096-token context, packing keeps utilization above 85%.micro_batch_size: 2per GPU is conservative for 40 GB A100s with QLoRA. You can push to 4 if VRAM allows — watchnvidia-smion the first batch.
Step 4: Write the DeepSpeed ZeRO-3 Config
ZeRO (Zero Redundancy Optimizer) shards model states across GPUs so each device only holds a fraction of the total memory footprint. ZeRO-3 is the most aggressive stage as it shards optimizer states, gradients, and model parameters.
- Why you need it for Llama 3.1-70B: 70B at bf16 is ~140 GB of weights alone — more than any single GPU. ZeRO-3 splits that across GPUs
- Why it helps for 8B too: sharding optimizer states (the largest memory consumer during QLoRA) means you can increase batch size or lora_r without OOM
ZeRO has three stages. Pick the right one:
For this tutorial (QLoRA on 8B, 4x A100-40G), ZeRO-3 with CPU offload is conservative but safe. You can remove the offload blocks if you have headroom.
Create deepspeed_z3.json:
{
  "zero_optimization": {
    "stage": 3,

    "offload_optimizer": {
      "device": "cpu",
      "pin_memory": true
    },

    "offload_param": {
      "device": "cpu",
      "pin_memory": true
    },

    "overlap_comm": true,
    "contiguous_gradients": true,
    "sub_group_size": 1e9,
    "reduce_bucket_size": "auto",
    "stage3_prefetch_bucket_size": "auto",
    "stage3_param_persistence_threshold": "auto",
    "stage3_max_live_parameters": 1e9,
    "stage3_max_reuse_distance": 1e9,
    "stage3_gather_16bit_weights_on_model_save": true
  },
  "gradient_accumulation_steps": "auto",
  "gradient_clipping": "auto",
  "steps_per_print": 10,
  "train_batch_size": "auto",
  "train_micro_batch_size_per_gpu": "auto",
  "wall_clock_breakdown": false,
  "bf16": {
    "enabled": "auto"
  }
}
The offload_optimizer and offload_param blocks move optimizer states and parameter shards to CPU RAM when they are not actively needed. This reduces per-GPU VRAM significantly — very useful when running near capacity. The cost is CPU-GPU transfer overhead, which slows training by roughly 15–30% compared to all-GPU ZeRO-3 without offload.
For most QLoRA jobs on 4x A100-40G, "offload_optimizer": {"device": "cpu"} is not strictly needed. Remove it if you want faster training and have enough GPU memory. Alternatively, you can keep it if you plan to scale lora_r above 64 or switch to full LoRA.
If your instance has enough GPU VRAM headroom (check after the first training step), remove both offload blocks:
"zero_optimization": {
  "stage": 3,
  "overlap_comm": true,
  "contiguous_gradients": true,
  ...
}
"auto" values — the fields set to "auto" let DeepSpeed read micro_batch_size and precision from the Axolotl config instead of duplicating them here. Do not hardcode these unless you are debugging a specific mismatch.
Step 5: Preprocess the Dataset
Before launching training, run Axolotl's preprocess step. This tokenizes the dataset, writes it to dataset_prepared_path, and exits. It does not start any training.
python -m axolotl.cli.preprocess llama3_qlora_multi_gpu.ymlThis step takes 2–5 minutes on Alpaca. When it finishes, read the decoded samples it prints:
[INFO] Sample 0:
<|begin_of_text|><|start_header_id|>user<|end_header_id|>

What are the three primary colors?<|eot_id|><|start_header_id|>assistant<|end_header_id|>

The three primary colors are red, blue, and yellow...<|eot_id|>
What to look for:
<|begin_of_text|>at the start and<|eot_id|>after each turn — these must be present- The user turn and assistant turn should be clearly separated by the header tokens
- No raw
{instruction}or{output}placeholders — those mean the template did not apply
If the tokens look garbled or the role boundaries are missing, fix chat_template or datasets.type in the YAML now. Highly likely that you would end up wasting many hours of training time if these are not fixed before proceeding.
For custom datasets, see the section on custom dataset formats below.
Step 6: Run the Training Job
accelerate launch starts one Python process per GPU, sets up NCCL for inter-GPU communication, and hands control to DeepSpeed. Make sure not to run python -m axolotl.cli.train directly without accelerate launch,else it will train on GPU 0 only with no distributed context.
Launch with accelerate which handles the multi-process setup:
accelerate launch -m axolotl.cli.train llama3_qlora_multi_gpu.ymlIf you want to explicitly target specific GPUs (e.g., skip GPU 0 which handles display):
CUDA_VISIBLE_DEVICES=1,2,3,4 accelerate launch -m axolotl.cli.train llama3_qlora_multi_gpu.ymlFor 8-GPU jobs on a SLURM cluster, create a launch script:
#!/bin/bash
#SBATCH --nodes=1
#SBATCH --ntasks-per-node=8
#SBATCH --gres=gpu:8
#SBATCH --mem=320G

source axolotl-env/bin/activate

accelerate launch \
  --num_processes=8 \
  --num_machines=1 \
  --mixed_precision=bf16 \
  -m axolotl.cli.train llama3_qlora_multi_gpu.yml
What you should see in the first 2 minutes:
[INFO] [real_accelerator.py] Setting ds_accelerator to cuda (auto detect)
[INFO] [comm.py] Initializing TorchDistributed with world_size=4
Loading checkpoint shards: 4/4 [01:12<00:00, 18.03s/it]
trainable params: 83,886,080 || all params: 8,114,376,704 || trainable%: 1.03
{'loss': 1.842, 'grad_norm': 0.981, 'learning_rate': 4.0e-05, 'epoch': 0.01}
{'loss': 1.724, 'grad_norm': 0.874, 'learning_rate': 8.0e-05, 'epoch': 0.02}
{'loss': 1.591, 'grad_norm': 0.810, 'learning_rate': 1.2e-04, 'epoch': 0.03}
Loss should drop from ~1.8–2.0 on the first step and stabilize somewhere in the 0.8–1.2 range by the end of epoch 1 on Alpaca. If it doesn't move at all, the learning rate is too low or the dataset formatting is almost certainly wrong. Stop the job and recheck the preprocess output (see Step 7).
grad_norm should stay below ~2.0. Occasional spikes to 3–4 are fine. Sustained values above 5.0 mean training is unstable — lower learning_rate by 5–10x.
Monitor GPU utilization in a second terminal:
watch -n 2 nvidia-smiTarget utilization on all GPUs should be 85–95%. If you see one GPU at 90% and others at 30%, the data loading pipeline is the bottleneck. In that case, increase the number of dataset workers or pre-tokenize the dataset offline first (the preprocess step from Step 5 handles this — make sure dataset_prepared_path is set).
Step 7: Verify VRAM Distribution
After the first training step completes, check how memory is distributed:
nvidia-smi --query-gpu=index,name,memory.used,memory.total --format=csv,noheaderExpected output for 4x A100-40G with QLoRA + ZeRO-3 and CPU offload enabled:
$ cat /proc/driver/nvidia/gpus/*/information | grep -E "Model|Memory"
0, A100-SXM4-40GB, 22451 MiB, 40960 MiB
1, A100-SXM4-40GB, 21983 MiB, 40960 MiB
2, A100-SXM4-40GB, 22102 MiB, 40960 MiB
3, A100-SXM4-40GB, 22319 MiB, 40960 MiB
ZeRO-3 distributes load evenly. If usage is balanced across GPUs, you are good.
If only GPU 0 shows memory usage and the others are near zero, DeepSpeed did not initialize. This usually means accelerate launch was not used. Stop the job, confirm the launch command, and restart.
If GPU 0 is consistently 2–4 GB higher than the others, that is expected — the rank-0 process carries some coordination overhead. It becomes a problem only if GPU 0 OOMs while others have headroom.
If any GPU hits the memory ceiling and the job crashes with CUDA out of memory:
- Reduce
micro_batch_sizefrom 2 to 1 — try this first - Reduce
sequence_lenfrom 4096 to 2048 - If you removed the CPU offload blocks in Step 4, add them back
Custom Datasets
The Alpaca dataset in the config above works out of the box, but for any real project you will be using your own data.
Axolotl supports four main dataset formats:
| Fine-Tuning Dataset Format & Schema Mapping | ||
|---|---|---|
| Format | Structure | When to Use |
| alpaca | instruction, input, output fields |
Single-turn instruction/responses |
| sharegpt | conversations array with from/value pairs |
Multi-turn chat setups |
| completion | Raw text field |
Pre-training style modifications without structural roles |
| jinja_template | Custom Jinja2 template mapping | Any custom data schema that does not conform to the default types above |
Alpaca format (JSONL):
{"instruction": "Summarize this clause.", "input": "The licensee shall not...", "output": "The clause restricts the licensee from..."}
{"instruction": "Translate to French.", "input": "Good morning.", "output": "Bonjour."}
ShareGPT format (JSONL):
{
  "conversations": [
    {"from": "human", "value": "What is the capital of France?"},
    {"from": "gpt", "value": "Paris."},
    {"from": "human", "value": "And Germany?"},
    {"from": "gpt", "value": "Berlin."}
  ]
}
Update the dataset block in your YAML to point to a local file:
datasets:
  - path: ./data/my_dataset.jsonl
    type: alpaca
For a Hugging Face Hub dataset:
datasets:
  - path: HuggingFaceH4/ultrachat_200k
    type: sharegpt
    conversation: llama3
    split: train_sft
The conversation: llama3 field tells Axolotl to map the human/gpt role names from the ShareGPT format to Llama 3.1's user/assistant tokens. Without it, role labels will be left as-is and the chat template will not apply correctly.
For a fully custom schema, use jinja_template:
datasets:
  - path: ./data/my_dataset.jsonl
    type: template
    field_instruction: question
    field_output: answer
    format: "<|begin_of_text|><|start_header_id|>user<|end_header_id|>\n\n{instruction}<|eot_id|><|start_header_id|>assistant<|end_header_id|>\n\n{output}<|eot_id|>"
⚠️ Always run a dataset sanity check before starting a full training run or after changing the dataset config. Do not skip this — it is the only way to confirm the template is rendering correctly before committing to a full training run.
python -m axolotl.cli.preprocess llama3_qlora_multi_gpu.ymlThis tokenizes your data, shows a few decoded samples, and exits. Read the decoded output. If you see garbled chat template tokens or missing <|eot_id|> markers, fix the dataset format now, not 6 hours into a training run.
Step 8: Save and Merge the Adapter
When training finishes, Axolotl saves the LoRA adapter (not the full model weights) to output_dir. The adapter is small — typically 100–500 MB for r=32 on 8B.
You have two choices for what to do with it.
Option A: Keep the adapter separate (faster iteration)
Load the base model and attach the adapter at inference time. This is useful when you are iterating on multiple adapters and want to swap them without re-merging.
from peft import PeftModel
from transformers import AutoModelForCausalLM, AutoTokenizer
import torch

base_model = AutoModelForCausalLM.from_pretrained(
    "meta-llama/Meta-Llama-3.1-8B-Instruct",
    torch_dtype=torch.bfloat16,
    device_map="auto"
)
model = PeftModel.from_pretrained(base_model, "./outputs/llama3-qlora-run1")
tokenizer = AutoTokenizer.from_pretrained("meta-llama/Meta-Llama-3.1-8B-Instruct")
The downside is that inference requires both the base model and the adapter to be present. If you are deploying to llama.cpp or Ollama, you cannot use a detached adapter. Choose Option B in that case.
Option B: Merge the adapter into the base weights
This produces a single set of full model weights with the adapter baked in. Required before exporting to GGUF.
from peft import PeftModel
from transformers import AutoModelForCausalLM, AutoTokenizer
import torch

# Load on CPU to avoid VRAM fragmentation during the merge operation.
# The merge is memory-intensive but does not benefit from GPU speed.
base_model = AutoModelForCausalLM.from_pretrained(
    "meta-llama/Meta-Llama-3.1-8B-Instruct",
    torch_dtype=torch.bfloat16,
    device_map="cpu"
)

model = PeftModel.from_pretrained(base_model, "./outputs/llama3-qlora-run1")
merged_model = model.merge_and_unload()

merged_model.save_pretrained("./outputs/llama3-qlora-merged")
tokenizer = AutoTokenizer.from_pretrained("meta-llama/Meta-Llama-3.1-8B-Instruct")
tokenizer.save_pretrained("./outputs/llama3-qlora-merged")

print("Merge complete.")
The merge takes roughly 3 minutes on CPU. The output directory will be ~16 GB (the full bf16 weights). If disk space is tight, merge directly to the export directory you plan to use for GGUF conversion.
Step 9: Quick Inference Test
Before exporting or deploying, run a sanity-check inference pass against the merged model:
from transformers import AutoModelForCausalLM, AutoTokenizer, pipeline
import torch

model = AutoModelForCausalLM.from_pretrained(
    "./outputs/llama3-qlora-merged",
    torch_dtype=torch.bfloat16,
    device_map="auto"
)
tokenizer = AutoTokenizer.from_pretrained("./outputs/llama3-qlora-merged")

pipe = pipeline(
    "text-generation",
    model=model,
    tokenizer=tokenizer,
    max_new_tokens=200,
    temperature=0.7,
    do_sample=True
)

messages = [
    {"role": "user", "content": "Explain gradient checkpointing in two sentences."}
]

prompt = tokenizer.apply_chat_template(messages, tokenize=False, add_generation_prompt=True)
output = pipe(prompt)
print(output[0]["generated_text"][len(prompt):])
Following shows an expected output. The exact words will differ every run because of temperature sampling. What you should be checking for is not a specific answer — it is whether the output is coherent, on-topic, and does not repeat the prompt back at you. A healthy response looks something like this:
Gradient checkpointing reduces GPU memory during backpropagation by
recomputing activations on-the-fly rather than storing them all in memory.
The tradeoff is roughly 20–30% slower training in exchange for a 4–8x
reduction in activation memory usage.
A broken response looks like one of the following:
# Repeating the prompt — chat template was not applied at inference
Explain gradient checkpointing in two sentences. Gradient checkpointing
is a technique that... Explain gradient checkpointing in two sentences...
# Incoherent — likely a chat template mismatch between training and inference
<|start_header_id|>user<|end_header_id|> Explain gradient checkpointing
<|eot_id|> checkpointing gradient the in sentences two explain...If the output is incoherent or repeats the prompt: the chat template was not applied correctly at training time. Check if chat_template: llama3 is set in your YAML, and that you ran the preprocess step before training. Also make sure that you are passing add_generation_prompt=True to apply_chat_template at inference.
If the output is grammatically fine but factually wrong on your target domain: that is expected after training on Alpaca — the Alpaca dataset is general instruction following, not your domain. It is only a validation run. Domain accuracy comes from your actual training dataset.
Common Errors and Fixes
NCCL error: unhandled system error, NCCL version 2.x
Usually a network interface mismatch. Set the NCCL socket interface explicitly:
export NCCL_SOCKET_IFNAME=eth0   # or ib0 for InfiniBand
export NCCL_DEBUG=INFO
accelerate launch -m axolotl.cli.train llama3_qlora_multi_gpu.yml
Run ip link show to find your actual interface name.
RuntimeError: Expected all tensors to be on the same device
This happens when part of the model is on CPU and part on GPU after ZeRO-3 parameter gathering. Usually caused by a module that bypasses the DeepSpeed parameter hooks. Check for any manual .to("cpu") calls in custom modules.
torch.cuda.OutOfMemoryErroron GPU 0 only
GPU 0 runs the master process, which carries overhead beyond its model shard. If it consistently OOMs while others have headroom, reduce how many parameters it holds live at once:
"zero_optimization": {
  "stage3_max_live_parameters": 5e8,
  "stage3_max_reuse_distance": 5e8
}
If that does not help, reduce micro_batch_size to 1 on all GPUs.
- Loss stuck at 1.8–2.0 and not moving
The model is not learning. The most common cause is a broken chat template — the model is receiving raw text without the <|begin_of_text|> / <|eot_id|> structure and cannot learn turn boundaries. Re-run python -m axolotl.cli.preprocess llama3_qlora_multi_gpu.yml and read the decoded samples carefully.
If the template looks correct, check that learning_rate is not too low. 2e-5 is effectively zero for QLoRA — use 2e-4.
- Loss is
NaNafter a few steps
Three things to check in order:
- Switch from
fp16: truetobf16: trueif on A100 or newer. fp16 has a narrower dynamic range and overflows more easily with LoRA adapters. - Lower
learning_rateby 10x. - Check your dataset for empty or null outputs:
from datasets import load_dataset
ds = load_dataset("json", data_files="./data/my_dataset.jsonl", split="train")
empty = ds.filter(lambda x: not x["output"] or x["output"].strip() == "")
print(f"Empty outputs: {len(empty)}")
ValueError: Tokenizer does not have a padding token
Llama 3.1 tokenizer has no pad_token by default. Add this to your config:
special_tokens:
  pad_token: "<|end_of_text|>"
Or set it programmatically before training:
tokenizer.pad_token = tokenizer.eos_token
tokenizer.padding_side = "right"
Full Config Reference
Here is the complete annotated config with every field used in this tutorial:
# llama3_qlora_multi_gpu.yml

base_model: meta-llama/Meta-Llama-3.1-8B-Instruct
model_type: LlamaForCausalLM
tokenizer_type: PreTrainedTokenizerFast

load_in_4bit: true
load_in_8bit: false
flash_attention: true
flash_rotary: true
fused_mlp: false

datasets:
  - path: mhenrichsen/alpaca_data_cleaned
    type: alpaca

chat_template: llama3
dataset_prepared_path: ./prepared_data
val_set_size: 0.02

sequence_len: 4096
sample_packing: true
pad_to_sequence_len: true

special_tokens:
  pad_token: "<|end_of_text|>"

adapter: qlora
lora_r: 32
lora_alpha: 64
lora_dropout: 0.05
lora_target_linear: true

output_dir: ./outputs/llama3-qlora-run1

num_epochs: 3
micro_batch_size: 2
gradient_accumulation_steps: 4

optimizer: adamw_bnb_8bit
lr_scheduler: cosine
learning_rate: 0.0002

warmup_steps: 50
logging_steps: 10
eval_steps: 200
save_steps: 200
save_total_limit: 3

bf16: true
fp16: false
tf32: true

gradient_checkpointing: true
deepspeed: ./deepspeed_z3.json

wandb_project: axolotl-llama3   # remove if not using W&B
wandb_run_id:                    # leave blank for auto-generated run ID
What's Next
Now that you have a merged model checkpoint in ./outputs/llama3-qlora-merged, there are two possible paths forward:
- Run the same job with Unsloth and compare throughput, loss curves, and output quality side by side. Use the same dataset, same hyperparameters, but different training stacks. We discuss this in the next chapter Chapter 3: Unsloth vs. Axolotl Forensic Comparison.
- Export to GGUF and serve it locally with llama.cpp or Ollama. Take the merged checkpoint from Step 8 above and follow Chapter 8: Exporting to GGUF and Serving with Ollama to get it running on a laptop or inference server without any Python dependencies.
- If this run crashed or produced bad outputs, refer Chapter 9: Common Llama 3 Fine-Tuning Errors and Fixes for the full set of failure modes with root causes and tested fixes.